Recording your screen on a Windows 11 PC is easier than many people realize. Whether you are trying to make a tutorial, record a software walkthrough, capture gameplay, save a presentation, or show someone how to fix a problem, Windows 11 has built-in tools that can help you record your screen without immediately downloading third-party software.
The two main built-in ways to record your screen on Windows 11 are Snipping Tool and Xbox Game Bar. Snipping Tool is usually the best option for quick screen recordings because it lets you select a specific area of your screen and record it. Xbox Game Bar is better for recording apps and games, especially when you want a quick keyboard shortcut. Microsoft says Snipping Tool can record video snips by opening the app, selecting the Record button, choosing New, selecting the area of the screen, and then pressing Start. You can also use the shortcut Windows key + Shift + R to start a video snip.
Method 1: Record Your Screen With Snipping Tool
For most people, the easiest way to record the screen on Windows 11 is with Snipping Tool. This is the same app many people already use to take screenshots, but newer versions of Windows 11 also include screen recording.
To use it, open the Start menu and search for Snipping Tool. Once the app opens, select the Record option instead of screenshot mode. Then choose New and drag your mouse around the area of the screen you want to record. This is useful because you do not have to record your entire display if you only want to show one window or one part of the screen.
After you select the recording area, click Start. Windows will begin recording after a short countdown. When you are finished, click Stop. From there, you can preview the recording, save it, share it, or open it in Clipchamp for additional editing. Microsoft’s support page confirms that after recording a video snip, you can save the recording as-is or select Edit in Clipchamp to work on it further.
Snipping Tool is a great choice for tutorials, quick demonstrations, website walkthroughs, app instructions, and short videos where you only need to show part of the screen. It is simple, clean, and already built into Windows 11.
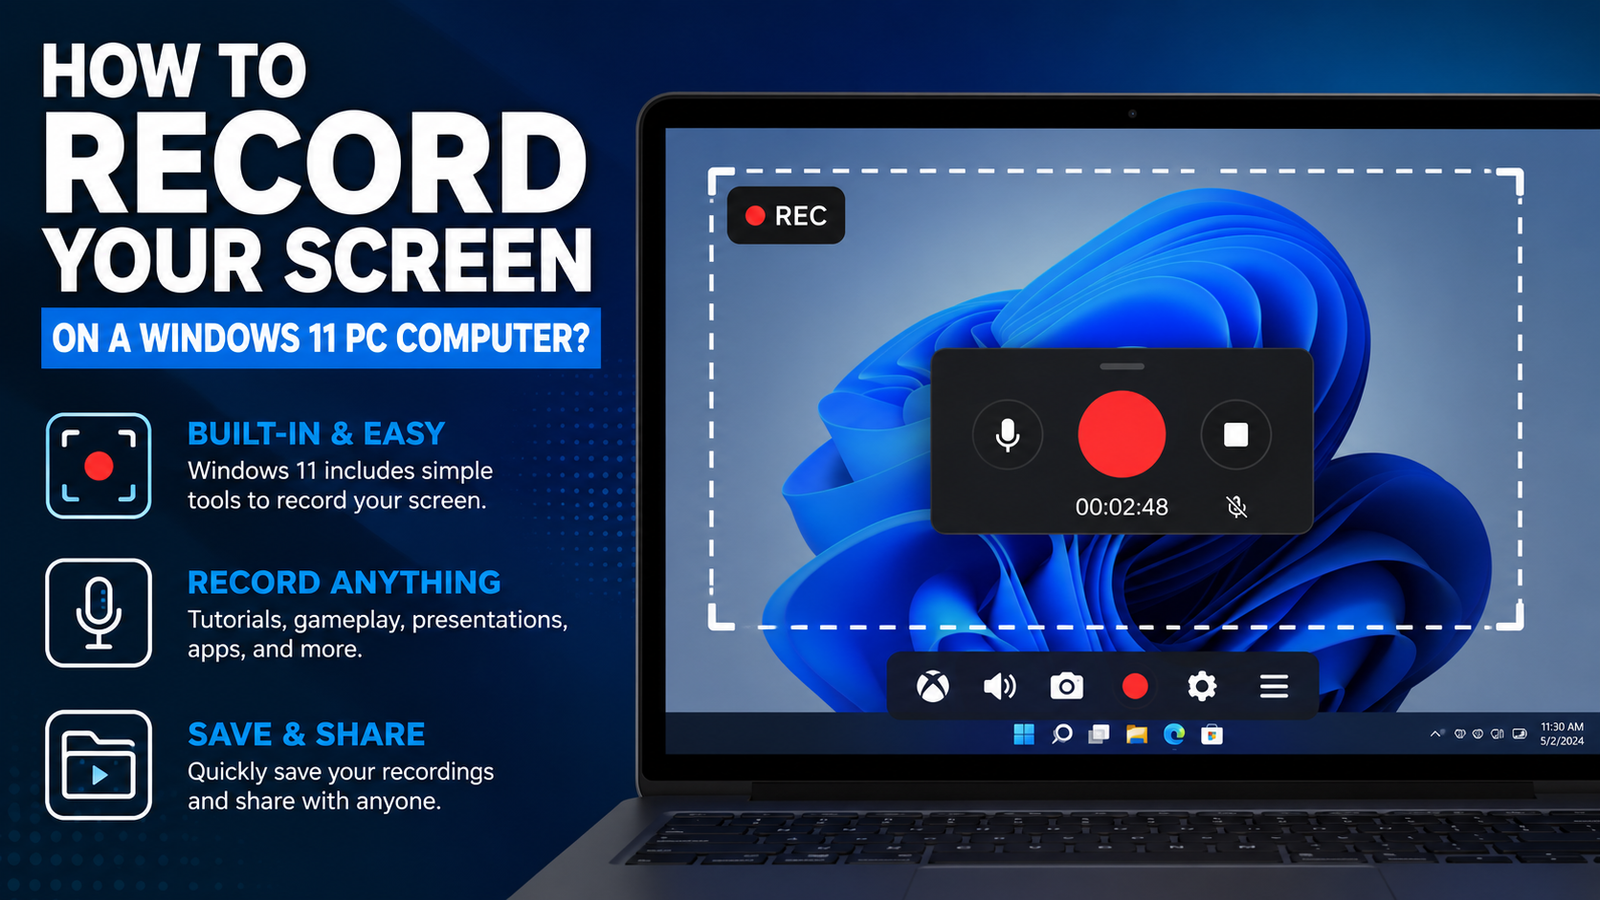
Method 2: Record Your Screen With Xbox Game Bar
Another built-in option is Xbox Game Bar. Even though the name makes it sound like it is only for gaming, Xbox Game Bar can also record many apps on your PC. It is especially useful when you want to quickly start and stop a recording with a keyboard shortcut.
To open Xbox Game Bar, press Windows key + G. A set of overlay controls should appear on your screen. From there, look for the Capture widget and press the record button. You can also start recording immediately by pressing Windows key + Alt + R. Microsoft’s Xbox Game Bar support instructions say this shortcut starts recording, and pressing the same shortcut again stops the recording.
Xbox Game Bar is a good option if you are recording gameplay, an app demo, or something happening inside a specific program. It is also useful if you want a fast way to begin recording without opening a separate app first. You can toggle the microphone during recording with Windows key + Alt + M, which is helpful if you want to include voice narration.
Which Screen Recording Method Should You Use?
If you want the simplest option, start with Snipping Tool. It is the better choice for most everyday screen recordings because you can select the exact area you want to capture. That makes it great for instructional videos, tech support clips, and quick demonstrations.
If you want to record gameplay or quickly capture an app with a shortcut, use Xbox Game Bar. It is faster once you know the keyboard commands and works well for many app-based recordings. However, it may not be the best option if you need advanced controls, multiple audio tracks, webcam overlays, or professional editing features.
For more advanced recording, you may eventually want a dedicated program such as OBS Studio, Camtasia, or another screen recorder. Those tools are better if you need scene layouts, webcam picture-in-picture, multiple audio sources, livestreaming, or more control over resolution and bitrate. But for many Windows 11 users, the built-in tools are enough.
Where Are Screen Recordings Saved?
When you record using Snipping Tool, Windows lets you preview and save the file after recording. Microsoft notes that Snipping Tool recordings can also be edited in Clipchamp, which is Microsoft’s built-in video editor option for Windows users.
With Xbox Game Bar, recordings are generally stored in your Videos folder under Captures. You can also open Xbox Game Bar with Windows key + G and look for the capture gallery to find your recent recordings.
Tips for Better Screen Recordings on Windows 11
Before recording, clean up your desktop, close unnecessary tabs, and turn off notifications so private messages or distractions do not appear in your video. If you are recording a tutorial, zoom in slightly or increase text size so viewers can clearly see what you are clicking. It also helps to do a short test recording first to make sure your microphone, screen area, and audio settings are working correctly.
If you are recording your voice, use an external microphone if possible. Even an inexpensive USB microphone will usually sound better than a laptop’s built-in mic. Good audio often makes a bigger difference than people expect, especially for tutorials and YouTube videos.
You should also think about what part of the screen you really need to show. Recording the entire screen can be useful, but it can also make text and buttons look small. Recording only the window or area you need can make the final video easier to follow.
Final Thoughts
Windows 11 gives you more than one way to record your screen without installing extra software. For most people, Snipping Tool is the easiest and cleanest option for quick screen recordings. If you want a fast shortcut or you are recording gameplay or an app, Xbox Game Bar is also a useful built-in tool.
The best method depends on what you are trying to record. Use Snipping Tool when you want a simple selected-area recording. Use Xbox Game Bar when you want a quick app or gameplay recording. And if you need professional features, consider moving up to a dedicated screen recording program. For everyday use, though, Windows 11 already includes the tools most people need.